Monday, December 29, 2014

Deepam muggu


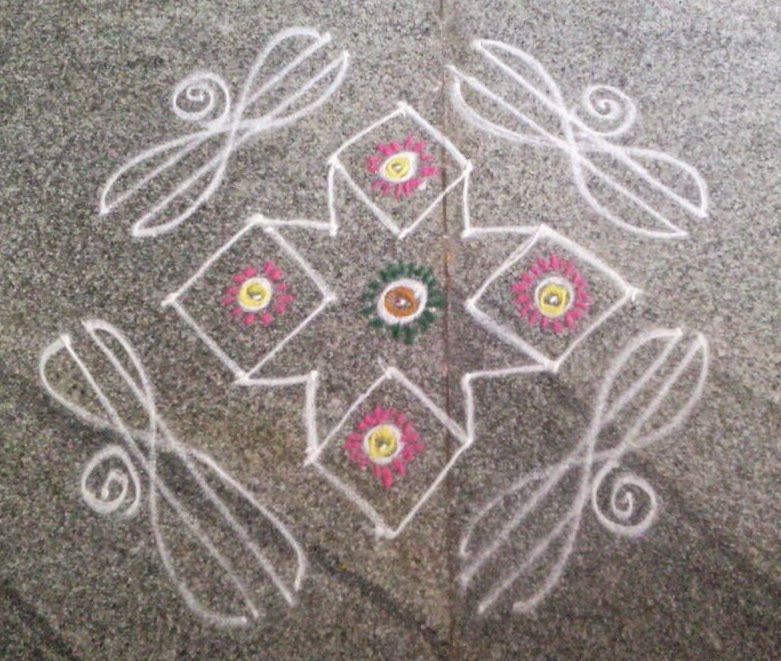
Deepam Muggu/rangoli design

I kept this freehand design in front of main door while entering into the house on  the occasion of puja at home.
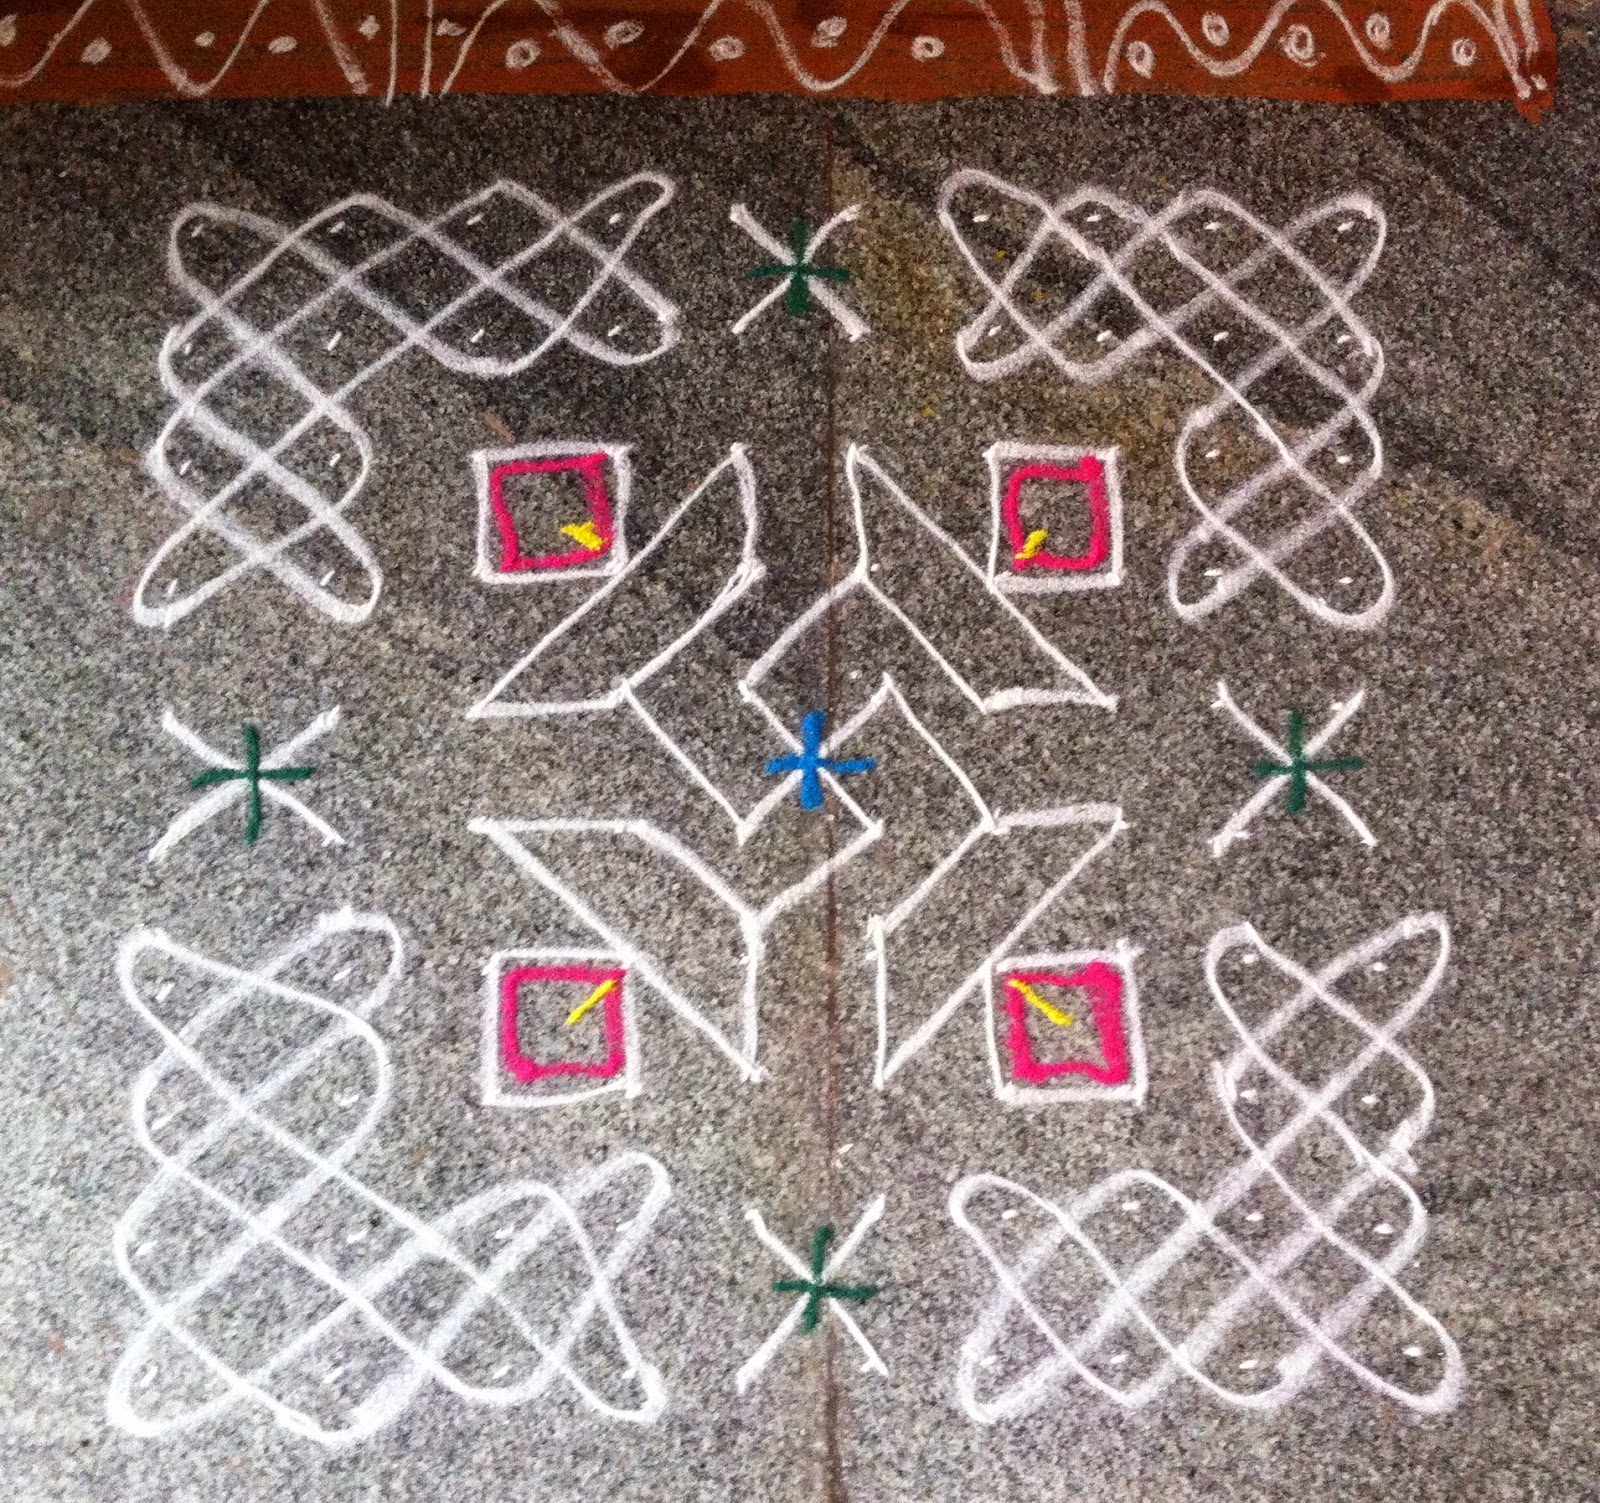
I have chosen  free hand design , melikala pattern for this and  used colours, rose petals, chamanthi flowers.
Inside I kept free hand  design, I kept melikala border at 3 sides.  
On the top, I kept Deepam design and filled with flowers in all these. There is no specific dots that I kept for this muggu.


tiippudu muggu

Dots for this muggu: 11x1

First put 11 dots in 1 row, next leave one-one  dot from each side next row onwards  and put till 1 dot.
I have drawn melikala(tippudu) muggu using middle dots and drawn sort of flower pot type pattern using outside dots at 4 sides. Next drawn simple border at 4 sides. 
This muggu can be drawn any day in front of home with any type of border.

Deepam muggu

Dots required for this muggu : 15x1

First put 15 dots in one row, next leave one-one dot from each side, from next row onwards and put till 1 dot.
In this muggu, I have kept tippudu muggu inside and filled colours in the deepam which is drawn outside.Here freehand border is drawn, but any border like melikala border also can be drawn to have some sync with inside tippudu muggu.This muggu can be kept during Karthika Masam where normally we will put deepam everyday evening at outside of the house. 


Deepam muggu

Dots  required for this muggu : 11x1

First Put 11 dots in one row , next leave one-one dot from each side from next row onwards and put till 1 dot. I have drawn deepam pattern outside at 4 sides. For this I didn't draw any border explicitly , instead of that I have drawn free hand pattern and added colours in that.
 

chinna muggu

Dots for this muggu : 3x3

First put 3 dots in  3 rows.
Next Join middle dot to middle dot which will form a diamond shape. Next put any free hand pattern for the remaining one-one dot. Here added colours to make this simple muggu/design colourful. This muggu can be drawn with dots or without dots 
 
(like freehand design).

Thursday, October 2, 2014

tippudu muggu

Dots required for this muggu : 9x5x5

First put 9 dots in 5 lines, next leave 2 dots from each side and put 5 dots in next 2 lines.
I have drawn tippudu muggu by passing through the dots.
Here border is drawn with small lotus flower and added colours in that. Border I didn't draw  at outside completely and I have chosen small flower pattern, so that this complete muggu looks like fitted into one box form (square pattern).


Wednesday, September 24, 2014

deepam muggu

Dots required for this muggu : 15x1

To put this muggu, first put 15 dots in 1 line,  next leave one-one dot from each side from next line onwards and put till 1 dot.
In this muggu, inside I kept small melikala muggu (with 5 to 1 dots). Outside I joined the dots into deepam and flower pattern.Finally I kept melikala border to have some sync with melikala muggu which is inside.I have added some lines with colours to make this muggu colourful.
This muggu can also be filled completely with colours.


baby frock muggu

Dots required for this muggu : 5x5

Put 5 dots in 5 rows to make  this baby frock muggu.
This muggu I learnt  during my childhood.:) and drawn this again after a long time.
Colours can also be added for this muggu if interested and this muggu can be done in very less time. Here I have added just a simple border, as I have a habit of drawing borders.
This muggu can be drawn without border also if you are looking for muggu without border.


muggu

Dots required for this muggu : 14x14

To draw this muggu, put 14 dots in 14 lines.  Here I have  drawn lines with some colours in this muggu.

tippudu muggu

Dots required for this muggu: 5x2, 4x1, 5x3

To make this muggu, first put 5 dots in 2 lines, next put 4 dots above these dots. Next put 5 dots in 3 lines again above these dots.
I have made this muggu in deepam kundulu form and added some colours to make this muggu little colourful. This will take very very less time.


Friday, September 19, 2014

tippudu muggu

Dots required for this muggu : 11x1

Put 11 dots in one line first, next leave each dot from each side from next line onwards(in telugu in some places it will be said like chukka vadili chukka or niluvu chukkalu) and put till 1 dot.
Here free hand border is drawn and any border like melikala border also can be drawn.
This muggu is drawn by combining small muggu (with 5 to 1 dots) at 4 sides at outside. I have added some colours to make this muggu little more colourful.


muggu

Dots required for this muggu : 7x1

This is a simple muggu with 7 to 1 dots.  I have added some dots with colour inside the circles, to make this muggu little colourful. I have drawn simple border to cover/finish the inside muggu completely.

swastik muggu


Dots required for this muggu:10x10

Put 10 dots in 10 lines. Next draw swastika and deepam form using 6x6 dots inside.
Draw melikala muggu as borders using remaining  dots.

In this muggu I have drawn one border pattern on top of this muggu, on sort of mud color thing (which will be called as Jaju in telugu). I have kept Jaju first on the ground and on that I have drawn border pattern using muggu powder.


tippudu muggu

Dots required for this muggu : 7x1

To make this tippudu muggu, first put 7 dots in one line, next leave one-one dot from each side from next line onwards and put till 1 dot.  
Draw a tube form by drawing lines and joining them into tube form as shown in this pic.
This muggu also looks like Nawar cot model if noticed from left side of this muggu. 

tippudu muggu


I will draw a border sometimes with 6-4-2 dots which is inside in this muggu. I have drawn this muggu by combining that border.  There is no specific dot count for this muggu. I have drawn this on a normal day and left it simple only. 
 

Saturday, September 13, 2014

flower muggu

Dots required for this muggu : 5x5

To put this muggu, put 5 dots in 5 lines.
First with 5x5 dots, small flower muggu has been kept.
As I have mentioned in one of my post, I will prefer to finish the muggu with some kind of border. 
So next I kept melikala border at 4 sides to have some contrast pattern with  inside muggu.
Finally I have added some colours to make this small muggu little colourful.


tippudu muggu

Dots  required for this muggu: 7x3x3

Put 7 dots in 3 lines, next leave 2 dots from each side and put 3 dots in 2 lines.
This is very simple muggu  and can be drawn in very less time.
For this muggu, separate border is also not required as outer side muggu itself formed as border.

Thursday, September 11, 2014

tippudu muggu

Dots required for this muggu : 11x1

To draw this muggu, put first 11 dots in 1st line and next leave one-one dot from each side from next line onwards and put till 1 dot.
Next draw the tippudu muggu by passing through the dots.
In this muggu, border also drawn in the same pattern of muggu to have the same pattern. To make this muggu little colourful, I have added pink and yellow colour for the 4 circle forms.

muggu

Dots used for this muggu : 5x3x3

I have just drawn this muggu by joining the inside dots in a swastika form first and outside I  have added some free hand design.

tippudu muggu

Dots required for this muggu : 7x5x1

I have drawn this simple tippudu muggu and added simple border.
Here border I have chosen like wave pattern border and drawn the same twice.

Sunday, September 7, 2014

tippudu muggu


Dots  required for this muggu: 7x1

To make this muggu, first put 7 dots in 1 line, next leave one-one dot from each side and put till 1 dot. For this muggu, I have added free hand design border  and added colours to make this simple muggu colourful.
This is a simple muggu and can be drawn without colours also. This will not take much time if you are not new to tippudu muggulu. 

tippudu muggu

Dots required for this muggu : 5x5 (for middle muggu)

To make this muggu, put 5 dots in 5 lines.  First draw a leaf form inside and next draw flower form outside. Whenever I will draw a muggu I will prefer to finish that one by drawing borders also most of the times. So here I have drawn melikala (tippudu) border. This melikala border can be drawn with any number of dots (like 3x3, 5x5, 6x6,7x7,..etc.) . I have chosen 5x5 dots to have match with middle muggu dots. Next again I have drawn one more small border type with 3x1 dots down the  melikala border at 4 sides. Added colours only for the middle muggu and left the border as it is.

tippudu muggu

For this muggu, there is no specific dot count. I have drawn this muggu by taking melikala border and made that as inside muggu and used small tippudu muggulu (which are with 5 to 1 dots) as borders. Here for those small muggulu at 4 sides, I have maintained different formats/types instead of having the same type at 4 sides.  Can be tried with same muggu format if want to have only one format at 4 sides.

flower muggu

Dots required for this muggu : 11x1

To draw this muggu, first put 11 dots in 1 line, next leave one-one dot from each side from next line onwards and put till 1 dot.This muggu is combination of flower pattern, leaf pattern (in middle) and deepam pattern.
Melikala border is drawn  at 4 sides to have contrast. Here I have used Green color for leaf, Pink color for flower form. This muggu looks also good, even without filling colours also.


muggu

This design one is painted infront of Tulasi kota. 
I have made this free hand design painting by mixing some different colour combinations like red and white (pink), white and dark green( light green), yellow and red (orange). 

Sunday, August 31, 2014

muggu

I have made this muggu as freehand design and added some colours. I have tried to form a exact circle shape, but it didn't come in  exact circle shape. But can be formed in circle form.

Friday, August 29, 2014

tippudu muggu

For this muggu I have chosen the melikala(tippudu) border with step wise pattern and this I have drawn on Vinayaka Chaviti day. There is no resemblance to draw this muggu on this day, just I have started with melikala border and finished in this final muggu. First kept 9 dots in 2 lines (9x9) and completed the melikala border for these dots.
Next kept 7 dots in 2 lines (7x7) and completed the melikala border for these dots. Next kept 5 dots in 2 lines (5x5) and completed the melikala border for these dots. Next kept 3 dots in 2 lines (3x3) and completed the melikala border for these dots. So using casual border pattern I have made this tippudu muggu. For this one,
border also I have chosen the same melikala border.
Added colours in the gaps(will be there after drawing complete border) instead of adding one small dot in each border row. 

tippudu muggu

Dots required for this muggu : 11x3
To make this muggu , put 11 dots in 3 lines and next put 5x3x5 lines above and below. 
Draw the melikala muggu by passing through the dots.
This muggu resembles some sort of 4 umbrellas together.

rangoli

I kept this rangoli during one of the competition.
I have chosen free hand pattern and melikala pattern and used multicolours to make this rangoli more colourful.

design on gadapa

Here I have posted design or muggu or painting on gadapa at the main door entrance.In some areas of telugu gadapa will be called as kadapa also. Everyday morning muggu will be kept on gadapa which will be at the main door entrance with rice flour or  some times  rice flour mixed with  pasupu(turmeric) after putting turmeric first, to welcome goddess Lakshmi.  On this gadapa painting  also will be done with different types of designs.                                                                          

Here I have  chosen design/muggu on the  gadapa with lines and flower pattern as I wanted to have simple design on the gadapa so that it can look neat and simple.  To make this, first I have drawn lines with dark orange color(by mixing red and yellow colours) painting. Next   I have prepared one template for flower pattern a paper and marked the flower pattern on the gadapa using pencil.  Next I have filled the flowers  with pink color  as I wanted to have pink which resembled lotus flower color. On the ground, just I have drawn simple wave pattern lines with green and red color dots.
 

tippudu muggu

Dots required for this muggu  are 9x3,7x2, 5x3x1. Start with putting 9 dots in 3 lines, next put 7 dots in 2 lines by leaving one-one dot at each side above 9 dots lines, next put 5,3,1 dots in one-one line above 7 dots.  Next draw the melikala muggu as shown in the post here. Here this muggu is drawn in a Asymmetry form, like only muggu is kept top of the above 9 dots and didn't repeat  the same at down. But the same muggu can be drawn  with 7x2,5x3x1 dots by putting the dots down after 9 dots line. I didn't draw a border explicitly, just I have covered the muggu with  lines with steps type pattern and  added some colours.

Sunday, August 24, 2014

tippudu muggu

Dots required for this muggu : 9x7x3 (for middle), 9x7x5x1(for border)
First put the dots for middle muggu with dots 9x7x3. Draw the melikala muggu by passing through the dots. Here melikala border only is drawn  at 4 sides.                        

tippudu muggu

Dots required for this muggu : 9x1
Put 9 dots to 1 dot by leaving one-one dot from each line (niluvu chukkalu) for the middle muggu and draw the melikala muggu by passing through the dots. Here melikala border  is drawn  with 6x4 dots and filled some colours in that.

tippudu muggu

Dots required for this muggu : 5x1

Here this tippudu muggu is drawn using lines at outside like geethala muggu.   This is very simple muggu and can be drawn in very less time.

Wednesday, August 20, 2014

tippudu muggu

For this muggu, I have chosen  without melikala muggu in inside and melikala muggu at outside. First I  drawn one muggu in a diamond pattern with count of 6 together. Next I have drawn small tippudu or melikala muggulu with 5 to 1 dots on the 6 sharp corners of that inside muggu,. Here I have drawn 6 different types of tippudu muggulu. Can be tried with same pattern muggu or with different number of dots if you love tippudu muggulu. Inside I have drawn lines with colours .

chinna muggu

Dots required for this muggu : 4x4
Put 4 dots in 4 lines. Here crown pattern muggu is drawn in 1st and last 4 dots line. Next 2 cone pattern muggu is drawn using 2nd and 3 line dots which are at outside. In middle one small flower pattern is drawn. Melikala border is drawn at outside.

Sunday, August 17, 2014

tippudu muggu

This muggu is kept on the occasion of Krishnasthami.
This muggu is in the form of Ooyala(Jhula).
Dots required for this muggu are 17 for one top horizontal line.  Next 2 dots in 10 lines (for legs pattern)  for 2 sides (left and right side). Next put 4 dots in 2 lines for base type at both sides (left and right which is in pink and green color below in this post). Next in middle put 9 dots in 3 lines horizontally. Next 8 dots in one line vertical line at 2 sides. Next draw the melikala muggu by passing through the dots.

tippudu muggu

Dots required for this muggu : 9x1
 
Put 9 dots to 1 dot in niluvu chukkalu format like leaving one-one dot at each side in each line. Next draw the melikala or tippudu muggu by passing through the dots. Here in this muggu 2 types of melikala muggu pattern is taken. Like one format is followed for up and down and one forma is followed for left and right side. A closed border is drawn, like there is no gap left in the border so that complete muggu formed a diamond shape once it is finished.

deepam muggu

Dots required for this muggu : 13x1

Put  13 dot to 1 dot by leaving one-one dot at each side in each line after 13 dots till 1 dot comes.  
Here I have drwan the muggu by adding colour lines. It can be filled completely also. 
I have drwan melikala border with 6x4x2 dots.

tippudu muggu

This tippudu muggu is drawn by placing 8 dots in 2 lines   horizontally and vertically (like dots had intersection) and added deepam (lamp)  with free hand design in the middle and on the top. Free hand  design like, in sort of crown pattern border is  drawn and added colors to make this muggu colorful.

chinna muggu

Dots required for this muggu : 7x4 (in between)

First put 7 dots in one line and place the dots in between (in some Telugu places will be said as madhya chukkalu) from next line on wards like 6 in next 2nd line, 5 in 3rd line and 4 in 4th line.
Start joining the 2nd and 3rd dots from 4th line to  other lines in a mountain and valley pattern as shown in post here. Next I have drawn free hand pattern with the remaining dots. I didn't draw a border for this explicitly. Can be drawn if want to have border.

Friday, August 8, 2014

muggu infront of tulasi kota

Dots required for this muggu are 5x1. Put 5 dots in one line and next put 3 and 1 dot in next 2 lines.  It is a simple tippudu muggu.
I have drawn this tippudu muggu in  deepam pattern and added extra lines with colors.

rangoli


I kept these designs on the occasion of VaraLakshmi vratam. I have chosen drawing muggu/ free hand design on the filled color instead of filling the color in muggu.  These designs can be tried with a lot of color and design combinations.


tippudu muggu

Dots required for this muggu  : 11x1
First put 11 dots and next leave one-one dot from next line on wards and put till 1 dot.

Draw the tippudu muggu by passing through the dots as shown in this post here. In the middle I have drawn a Swastika pattern. But  where as for those dots also melikala muggu can be drawn in the middle. To cover this muggu, instead of border at 4 sides, I have chosen diamond shape pattern  and draw the lines at 4 sides in diamond form. On the outside of that line at 4 sides, I have drawn a crown pattern free hand design and added multi colors in that. On the top of this muggu,  I have drawn a border on Jaju.


tippudu muggu

Dots required for this muggu 5x1. This is very very simple tippudu muggu and very small tippudu muggu. To make this muggu little bigger, I have enclosed that one in a circle form, and at outside drawn a line and oval type pattern and used colors inside.

tippudu muggu

Dots required for this muggu : 8x2x2
Put 8 dots in 2 lines and leave one-one dot from next line on wards and put till 2 dots in the last line. Draw the tippudu muggu by passing through the dots as shown in the post here.  In this tippudu muggu, after drawing the lines it formed a sort of Trishulam pattern at 4 sides. I have enclosed this muggu with step wise border and drawn the border in a symmetry pattern. Finally added colors in the border lines.
     

chinna muggu

Dots required for this muggu : 3x3
Put 3 dots in 3 lines. Next join each dot in 4 sides using dots which are at outside. Middle I have added a small circle form. I have drawn some freehand design at outside. This muggu can be drawn like freehand design without dots also. I have added colors to make this small muggu looks good.


tippudu muggu


To make this muggu, put 5 dots in 2 lines and put one-one dot in the next line. I have enclosed the inside muggu in a box and draw a border outside of that box. Here I have applied Jaju at 4 sides and on that I have drawn a outline border. Just I have tried this small muggu differently.